CWCOM was written by an Australian Radio Ham, for Windows 95, However, it is still in use today, and can also be used on LINUX and MAC machines. The original author has discontinued his support for his original website, and I have taken 2.up the challenge, to keep it alive, by writing a Blogsite covering just about all aspects of downloading, installing, and using the program.
https://morsepower.blogspot.com/p/blog-page.html
CWCOM is an excellent tool for new users, and for experts, in the fine art of communicating using morse code. Because of the way the program works, it does need some initial "tweeking" to get the best experience, however, all those "tweeks" are listed with step by step instructions on my blog. So . you have no excuse !... For new users, the program is somewhat "unforgiving", inasmuch as it will not allow you to make mistakes easily.... the mistakes WILL appear on screen, e.g. if you do not send a letter correctly, such as, O --- but send it as -- - , then it will appear on screen as MT.. so, it encourages new users to be more careful and precise in how they form the letters with their key. It is a good trainer ! ! .. much better than getting your knuckles rapped ! ! ! ..
For experienced users, it can accomodate speeds up to 50 wpm... although I have never managed more than 24 wpm on any of my straight keys !...
Points to note about CWCOM..
1. It is FREE - Free to use.... Free to download... Free to install (download info on the blog)
2. There are lots of things you DON`T NEED ! !
A licence, or
A rig ( although a computer/laptop is required! ) or
An Antenna, or
To be a Radio Ham , or
A callsign ( you can make one up, or use your name if you are not a radio ham)
To be a super speed sender...... all skill levels are welcome...
There are some things you DO NEED !
1. to be really interested in using Morse Code ( CW is a mode, { like RTTY or SSTV or PSK } not a language !) to communicate with like-minded people around the world
2. to be able to make some conversation, longer than a CQ call, followed by a 599 report and 73`s.
( all qso`s are 599 on the internet, so what is the point of reporting that ? ? ! ! ! )
You can use the keyboard to type your messages, however, it is best to use the Down Arrow key, or a Mouse, if you have not got a Morse Key....
You can attach either a Straight Key, or a Paddle key, to your computer, ( see relevant page on the blogsite)
There is NO.......
"Moderation",...
"Log in"
"Registration"
" Speed limit ! "
I am not a radio ham.... but have had an interest in radio since age 8, when my father got me a IVALEK crystal set, and eventually, I joined the Royal Navy, as a Wireless Telegraphist in 1960 until 1972, I last used MORSE live on air in 1968 , until I found CWCOM.... I have been using CWCOM for the past 5 years, and monitor the default channel 1000 from about 14:00 G.M.T, until about 22:00 G.M.T. DAILY.. So you can almost always find me (G3MS) on there to chat to or to ask questions if you have a problem.
Looking forward to having a nice long "ragchew" with you...
73 for now
dit dit

This blog was originally supposed to be about my photographic experiences... However, it is now about my morse key collection. and stories about the keys, and their refurbishment. For those interested in CWCOM ( a free program to send and receive morse over the internet). please visit my other blogsite for all information, including download sites https://morsepower.blogspot.com/p/blog-page.html
Friday 30 November 2018
Thursday 28 June 2018
G.P.O. PATT 1056A Re-furb
Newbury Radio Rally, on the Newbury Showground, in Berkshire, England, is the only Radio Rally I attend..! mainly because it makes a nice day out, and there are plenty of "junk" type stalls, with loads of actual radio bits and bobs !.. not too much in the way of computer stuff, so it is always interesting to look around.... I, generally, don`t go there with the intention of actually buying anything, although my interest in old straight morse keys, often is the spur to look closer at the tables to see if one is hidden underneath or at the back amongst unloved other items !...
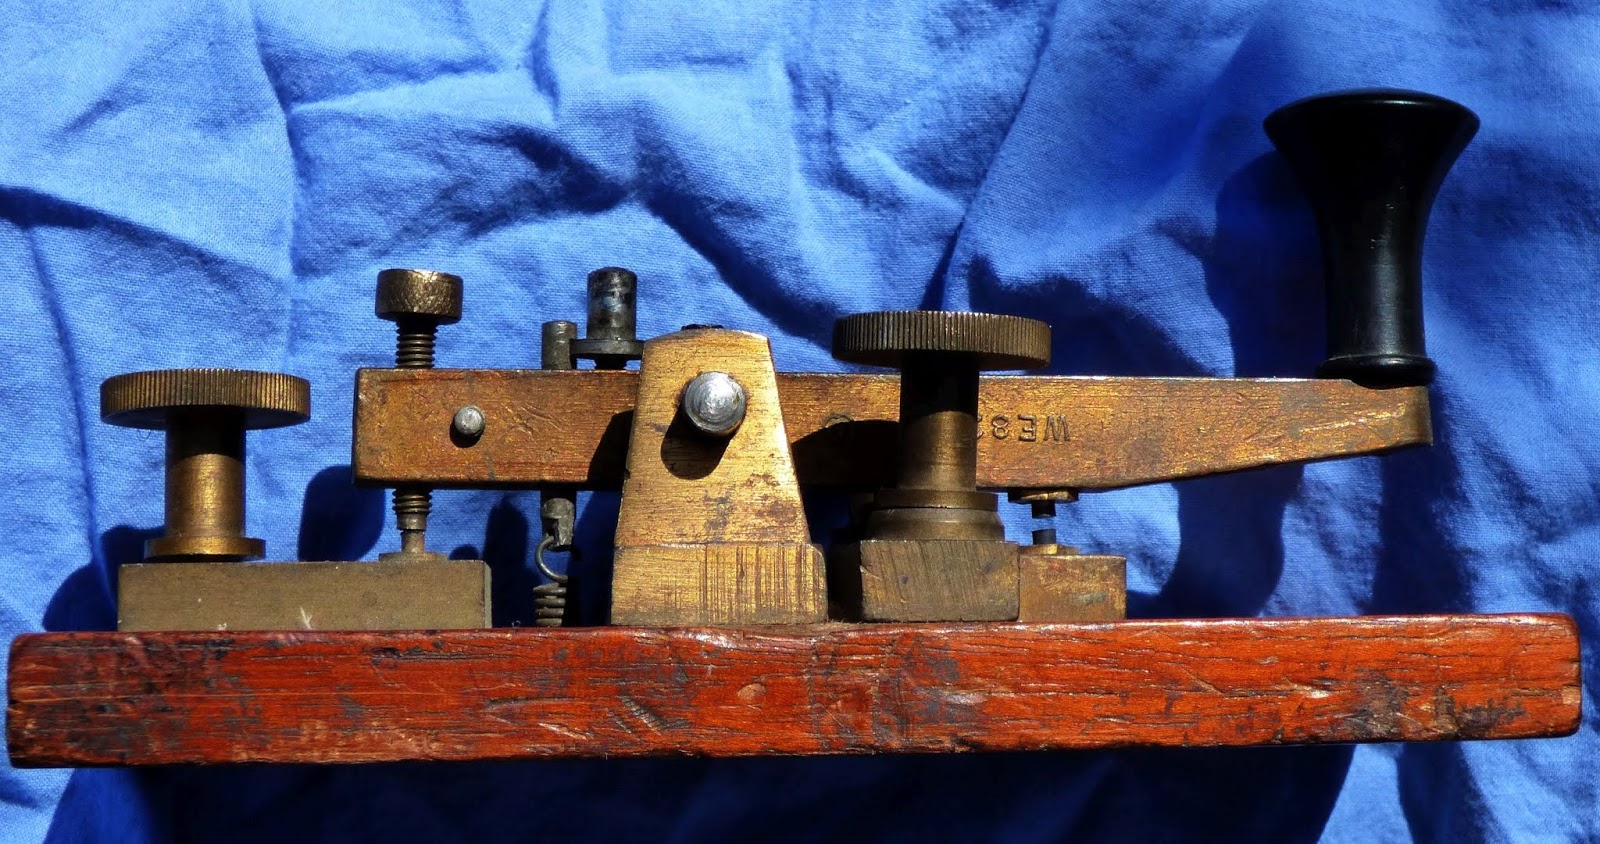
On Sunday, I was lucky ! ! ! ... about half way around, I spotted a couple of keys, right at the front of the next stall, and made a quick dash ! ! ... one was the very common WT8AMP and the other was one I have been "lusting after" on ebay for a couple of years... The G.P.O. ( U.K. Post Office ) PATT 1056A.
Historical note..... From research on the internet, it appears that this style of key was made from about 1830 to 1840 and still around in 1900... Probably a couple of manufactureres, one of which is "Walters Electrical Company"... and checking on that company history, it appears they "took over" the original company that made this style of key, in 1908. As my key has WE8208 moulded into the rocker arm, I would date this key some time around that era... Bearing in mind, the original company, would probably have lots of "stock" parts available at the takeover time, and the "new" company (Walters Electrical) would most likely continue to build the keys with "old stock" before re-designing, at a later date. The key is well engineered, and uses a "unique" tapered pin for the rocker arm pivot point... by slackening the screw on the rocker arm, it is possible to tap gently on the right hand side, to take up some wear that may occur during use, or to "tighten up" the actual pivot rocking motion.
 (click the pic for larger view)
As you can see from the pic, it was in a poor state, although some "purists" would have you believe that it should stay that way, for me, it was something that I would love to clean up... and I did ! ! .. I cleaned up with a price of £15.00 (about $20.00 usd)... These keys sell for above £40.00 on ebay.
After purchase, I celebrated with a nice cool Ice Cream Cone, and carried on around the rest of the show, but no other keys caught my eye... and so, we came home "the pretty route" , and then I started work on the "re-furb".
First , I had to remove all the candle wax, from the cavities underneath, so that I could access the brass bolts that held the parts on to the top of the Mahogany base.
 Here is a pic of the base with all parts removed.....


As you can see, it had been "misused" to say the least,.... someone had screwed a small "light bulb holder" near the front left corner, and dented the wood,

so, I used some very course glass paper, on a flat surface, to remove that depression and at the same time clean up the rest of the dings !.

Next I dealt with the very rough "countersinked" holes, where the key would have originally been screwed down to the counter at the operating position...

I used my own countersink, in my electric drill for a minute or so,

and that was the top surface finished.... a quick rub around on the edges,cleaned the dings from the sides, but the front end looked like it had been "sawn off" by someone who was not very good at woodwork... I got my small tenon saw, and my "square" in position to make sure that the end was finished off "true" and "square"..

.. unfortunately, the person who cut the end off, also cut off the "normal" identificating mark with the number PATT1056A indented.. I cannot replicate that, so I am leaving it "as is".
I did put a coat of varnish on, but was not "impressed" as it was very old stuff, and eventually just gave it several coats of good furniture polish, and buffed it up.

With all the parts lined up on the bench, it just needed my Electric Drill, and a rotary wire brush, to clean up all the brass parts.... leaving them looking like new...


Re-assembling the key, I noticed that the actual contacts were not lined up correctly, so I had to enlarge the holes on the front base ( anvil ) contact to give a little " play " or movement to get them lined up properly, and then screw down tight.
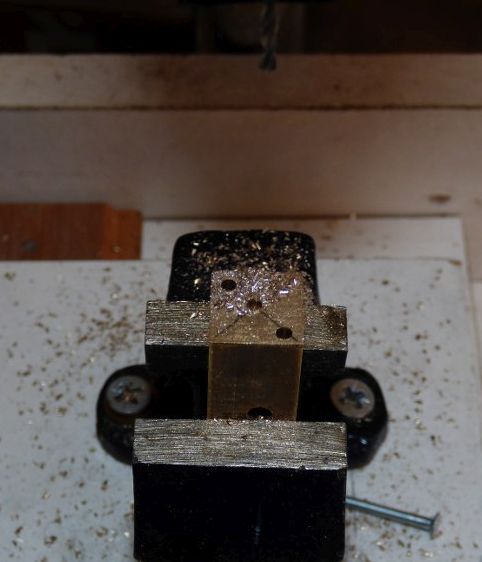
I also noticed, that the Anvil point surface was not " true and square"... it had a distinct slope to one side... which would cause keying problems, when in operation. To rectify this fault, I placed the anvil in my vice, and found two small brass washers to fit over the contact, and then using them as the "true and square" surface, ran a fine file across until the file was running on the washers, ensuring a proper finish.


Once that had been checked with the set square, it was returned to the base, and lined up with the upper contact, ( rocker or hammer ) which, also needed attention to bring the two contacts into a "face to face" contact... Using some P1200 grit, wet and dry paper, I drew it through the "gap" between the two, with the grit side uppermost, quite a few times, until, when checking against the light, the two faces "matched".
Finally, I had to do a bit of a bodge, on the knob, as it was chipped around the bottom edge.. and I also fitted a "spark guard" disc so that I could use the key in my usual ( unusual ) manner !. I don`t think it "detracts" too much from the original, as I have seen other PATT 1056A keys with a spark guard fitted.

All that needed to be done now, was to spray the whole key with some spray on furniture polish to slow down the discolouration...Then cut a piece of washing up sponge cloth for the base,.. . and to set the key up according to my descriptions on another page on here ( how to set up a straight key )..
Wire it up, and then plug it in to the Laptop, and open CWCOM... to let the world know it was back in action after over 100 years.. In use, after some minor tweeks to the adjustments, this key is a delight to use, and becoming one of many "favourites" in my collection ! ! ! .
so.... here is how it was.....

And here it is now..... all together again ! ! ...
 click the pic for larger view

click the pic for larger view.
If you would like to contact me, on CWCOM ( morse over the internet )... check out my other blog
https://morsepower.blogspot.com/p/blog-page.html
for information about it, download, and settings etc...
Watch the video,.... click on the square for full screen, and turn up the volume ! !
Hope you enjoy it as much as I do.
On Sunday, I was lucky ! ! ! ... about half way around, I spotted a couple of keys, right at the front of the next stall, and made a quick dash ! ! ... one was the very common WT8AMP and the other was one I have been "lusting after" on ebay for a couple of years... The G.P.O. ( U.K. Post Office ) PATT 1056A.
Historical note..... From research on the internet, it appears that this style of key was made from about 1830 to 1840 and still around in 1900... Probably a couple of manufactureres, one of which is "Walters Electrical Company"... and checking on that company history, it appears they "took over" the original company that made this style of key, in 1908. As my key has WE8208 moulded into the rocker arm, I would date this key some time around that era... Bearing in mind, the original company, would probably have lots of "stock" parts available at the takeover time, and the "new" company (Walters Electrical) would most likely continue to build the keys with "old stock" before re-designing, at a later date. The key is well engineered, and uses a "unique" tapered pin for the rocker arm pivot point... by slackening the screw on the rocker arm, it is possible to tap gently on the right hand side, to take up some wear that may occur during use, or to "tighten up" the actual pivot rocking motion.
As you can see from the pic, it was in a poor state, although some "purists" would have you believe that it should stay that way, for me, it was something that I would love to clean up... and I did ! ! .. I cleaned up with a price of £15.00 (about $20.00 usd)... These keys sell for above £40.00 on ebay.
After purchase, I celebrated with a nice cool Ice Cream Cone, and carried on around the rest of the show, but no other keys caught my eye... and so, we came home "the pretty route" , and then I started work on the "re-furb".
First , I had to remove all the candle wax, from the cavities underneath, so that I could access the brass bolts that held the parts on to the top of the Mahogany base.


As you can see, it had been "misused" to say the least,.... someone had screwed a small "light bulb holder" near the front left corner, and dented the wood,

so, I used some very course glass paper, on a flat surface, to remove that depression and at the same time clean up the rest of the dings !.

Next I dealt with the very rough "countersinked" holes, where the key would have originally been screwed down to the counter at the operating position...

I used my own countersink, in my electric drill for a minute or so,

and that was the top surface finished.... a quick rub around on the edges,cleaned the dings from the sides, but the front end looked like it had been "sawn off" by someone who was not very good at woodwork... I got my small tenon saw, and my "square" in position to make sure that the end was finished off "true" and "square"..

.. unfortunately, the person who cut the end off, also cut off the "normal" identificating mark with the number PATT1056A indented.. I cannot replicate that, so I am leaving it "as is".
I did put a coat of varnish on, but was not "impressed" as it was very old stuff, and eventually just gave it several coats of good furniture polish, and buffed it up.

With all the parts lined up on the bench, it just needed my Electric Drill, and a rotary wire brush, to clean up all the brass parts.... leaving them looking like new...


Re-assembling the key, I noticed that the actual contacts were not lined up correctly, so I had to enlarge the holes on the front base ( anvil ) contact to give a little " play " or movement to get them lined up properly, and then screw down tight.
I also noticed, that the Anvil point surface was not " true and square"... it had a distinct slope to one side... which would cause keying problems, when in operation. To rectify this fault, I placed the anvil in my vice, and found two small brass washers to fit over the contact, and then using them as the "true and square" surface, ran a fine file across until the file was running on the washers, ensuring a proper finish.


Once that had been checked with the set square, it was returned to the base, and lined up with the upper contact, ( rocker or hammer ) which, also needed attention to bring the two contacts into a "face to face" contact... Using some P1200 grit, wet and dry paper, I drew it through the "gap" between the two, with the grit side uppermost, quite a few times, until, when checking against the light, the two faces "matched".
Finally, I had to do a bit of a bodge, on the knob, as it was chipped around the bottom edge.. and I also fitted a "spark guard" disc so that I could use the key in my usual ( unusual ) manner !. I don`t think it "detracts" too much from the original, as I have seen other PATT 1056A keys with a spark guard fitted.

All that needed to be done now, was to spray the whole key with some spray on furniture polish to slow down the discolouration...Then cut a piece of washing up sponge cloth for the base,.. . and to set the key up according to my descriptions on another page on here ( how to set up a straight key )..
Wire it up, and then plug it in to the Laptop, and open CWCOM... to let the world know it was back in action after over 100 years.. In use, after some minor tweeks to the adjustments, this key is a delight to use, and becoming one of many "favourites" in my collection ! ! ! .
so.... here is how it was.....

And here it is now..... all together again ! ! ...


click the pic for larger view.
If you would like to contact me, on CWCOM ( morse over the internet )... check out my other blog
https://morsepower.blogspot.com/p/blog-page.html
for information about it, download, and settings etc...
Watch the video,.... click on the square for full screen, and turn up the volume ! !
Hope you enjoy it as much as I do.
Monday 12 March 2018
An "Elegant" Torsion Bar Single Paddle Key
Almost 2 years ago, I wrote about how I made a simple paddle key using odds and ends I found in the bit box !...
http://nemosphotography.blogspot.co.uk/2015/04/home-made-paddle-morse-key-almost-no.html
I have played about with that... and tried various different versions, none of which were worth recording or making a blog about... so... I decided that it was probably time I tried to make a "decent" single paddle key.
Based on a single lever, using the "springiness" of the lever, I decided to use a simple 3.5 mm brass rod that I had left over from another job... and to use other bits from making the GEMSKEY "designer key"
http://nemosphotography.blogspot.co.uk/2015/11/how-i-made-my-own-designer-straight.html
which, altogether, made it a very low cost key to make.
Here is the process..... bear in mind that I have very limited experience of working with metals, and my "workshop" is not equipped with modern milling and drilling machines !... I only have a bench vice, and a DIY vertical drill stand. a few files, and a couple of hacksaws .
First of all, I decided to make the "contact" pillars. these consisted of two squares of Aluminium, with the corners cut off at 45 degrees.... I needed to do these first, to set the height of the contacts so I could eventually set the rear drill hole heigt to agree with them.. Originally, I was going to "concave" cut the shoulders of these two, but this proved to be more difficult than I anticipated, and ruined one piece of work in the process !! ! ...( Good job I started off with three pieces! ! )..

checking to make sure they are "squared up" to each other after cutting & filing


Marking out the corners, and cutting them off, prior to final profile filing, using the drill bit in the centre hole,


Once I was satisfied that they were all the same shape, and "squared up"... I started on the rear support post, which was made from square brass stock...
This needed the central hole for the torsion rod/lever .... a threaded hole in the top for the "lock" screw, and also a threaded hold in the bottom for the securing screw to the base... To prevent it from moving from side to side, during operations. I also drilled two small holes in opposite corners, so that I could fit into them, cut off lengths fo small "panel pin" nails...


when the securing screw pulled the pillar down on to the base, they would impale themselves and prevent rotational movement. Care had to be taken on the initial "pull down" to ensure that the pillar was "square on" to the centre line of the base.
Starting the "tap" by hand, proved to be a bit troublesome, on my previous key, so I decided that I would utilise the Pillar Drill stand, and put the tap into the chuck, to ensure it started of vertical and true...


once a couple of threads had been made, I then transferred the workpiece to my bench vice for the remainder of the tapping to be completed..
The next step was to do the tapping of the side contact supports, which I did in the same manner..


.
Originally I was going to use the "nail pins" to prevent momement, but on completion , this was not necessary, and an advantage of that, is that the surface of the base was only damaged by one hole for the securing bolt to pass through... ( I have in mind, later on, to move the contact support pillars closer to the rear support post... covering the present holes with a couple of brass dome nuts secured from below.)
Once I was satisfied that they were "complete"... I moved on to the "hammer" , on the torsion bar/paddle lever....
My idea was that the "springiness" of the torsion bar, could be adjusted by moving it back or forward... ( short or long reach arm )... giving a variable amount of resistance/springiness.... This necessitated the "hammer" to be adjustable too....

so I drilled a small hole and tapped it, so that I could use a screwdriver to secure the "hammer" in postion after moving the torsion bar shorter or longer.
To ensure that both ends of the "hammer" were "true" and "square".... I put the "hammer" into the drill chuck, and brought it into contact with the bastard file laying flat on the work table.

The finished Torsion Bar Single lever looking good ! !

The finger plate was made from a "re-fashioned" ice scraper for the fridge !... and I use a long wooden dowel with a 3.5 mm hole drilled into it... and a cut out for the plastic "Finger plate" which was araldited together... ( the finger plate dowel was just a "push fit" on to the lever arm ).
The contact points, and their locking screws, were made, using leftover connecting pillars, which gives the key a "professional" look. I really wanted one more, for the rear pillar locking, but ......
So,... now it was time to deal with the base.... this was another "left over" from a previous order I had made for bases.... Being made of MDF, it was easy to work. I marked up the location of the holes, drilled them and placing the base upside down on a foam sponge mad... counter sunk the underneath holes ... Later I "routed" out the routing for the wiring, and drilled a hole in the far end to accomodate the wire with the 3.5mm jack plug on.

 Putting it all together, it turned out "quite nice"... however, I have decide to call it my


http://nemosphotography.blogspot.co.uk/2015/04/home-made-paddle-morse-key-almost-no.html
I have played about with that... and tried various different versions, none of which were worth recording or making a blog about... so... I decided that it was probably time I tried to make a "decent" single paddle key.
Based on a single lever, using the "springiness" of the lever, I decided to use a simple 3.5 mm brass rod that I had left over from another job... and to use other bits from making the GEMSKEY "designer key"
http://nemosphotography.blogspot.co.uk/2015/11/how-i-made-my-own-designer-straight.html
which, altogether, made it a very low cost key to make.
Here is the process..... bear in mind that I have very limited experience of working with metals, and my "workshop" is not equipped with modern milling and drilling machines !... I only have a bench vice, and a DIY vertical drill stand. a few files, and a couple of hacksaws .
First of all, I decided to make the "contact" pillars. these consisted of two squares of Aluminium, with the corners cut off at 45 degrees.... I needed to do these first, to set the height of the contacts so I could eventually set the rear drill hole heigt to agree with them.. Originally, I was going to "concave" cut the shoulders of these two, but this proved to be more difficult than I anticipated, and ruined one piece of work in the process !! ! ...( Good job I started off with three pieces! ! )..

checking to make sure they are "squared up" to each other after cutting & filing

I decided that it would be a good idea to drill the contact adjuster hole in each one, and then re-profile, if necessary to ensure they were all the same size, by keeping the drill bit in the centre hole during the process. I made a small "jig" to hold the pieces during drilling.

Marking out the corners, and cutting them off, prior to final profile filing, using the drill bit in the centre hole,


Once I was satisfied that they were all the same shape, and "squared up"... I started on the rear support post, which was made from square brass stock...
This needed the central hole for the torsion rod/lever .... a threaded hole in the top for the "lock" screw, and also a threaded hold in the bottom for the securing screw to the base... To prevent it from moving from side to side, during operations. I also drilled two small holes in opposite corners, so that I could fit into them, cut off lengths fo small "panel pin" nails...


Starting the "tap" by hand, proved to be a bit troublesome, on my previous key, so I decided that I would utilise the Pillar Drill stand, and put the tap into the chuck, to ensure it started of vertical and true...


once a couple of threads had been made, I then transferred the workpiece to my bench vice for the remainder of the tapping to be completed..
The next step was to do the tapping of the side contact supports, which I did in the same manner..


.
Originally I was going to use the "nail pins" to prevent momement, but on completion , this was not necessary, and an advantage of that, is that the surface of the base was only damaged by one hole for the securing bolt to pass through... ( I have in mind, later on, to move the contact support pillars closer to the rear support post... covering the present holes with a couple of brass dome nuts secured from below.)
Once I was satisfied that they were "complete"... I moved on to the "hammer" , on the torsion bar/paddle lever....
My idea was that the "springiness" of the torsion bar, could be adjusted by moving it back or forward... ( short or long reach arm )... giving a variable amount of resistance/springiness.... This necessitated the "hammer" to be adjustable too....

so I drilled a small hole and tapped it, so that I could use a screwdriver to secure the "hammer" in postion after moving the torsion bar shorter or longer.
To ensure that both ends of the "hammer" were "true" and "square".... I put the "hammer" into the drill chuck, and brought it into contact with the bastard file laying flat on the work table.

The finished Torsion Bar Single lever looking good ! !

The finger plate was made from a "re-fashioned" ice scraper for the fridge !... and I use a long wooden dowel with a 3.5 mm hole drilled into it... and a cut out for the plastic "Finger plate" which was araldited together... ( the finger plate dowel was just a "push fit" on to the lever arm ).
The contact points, and their locking screws, were made, using leftover connecting pillars, which gives the key a "professional" look. I really wanted one more, for the rear pillar locking, but ......
So,... now it was time to deal with the base.... this was another "left over" from a previous order I had made for bases.... Being made of MDF, it was easy to work. I marked up the location of the holes, drilled them and placing the base upside down on a foam sponge mad... counter sunk the underneath holes ... Later I "routed" out the routing for the wiring, and drilled a hole in the far end to accomodate the wire with the 3.5mm jack plug on.


Elegant Single Torsion Bar Paddle Key.
Here is the "long arm" version

Here it is in the "short arm" version

Subscribe to:
Posts (Atom)